✨ How Eazyads Works - Simple 4-Step Process
Choose Type
Images: Product, User+Product, Image Transform, Freestyle
Videos: Product, User+Product, Visual Effects, Freestyle
Select Filter
Swipe to choose a style or use "Your Vibe" for custom
Upload/Capture
Upload a photo or take one with your camera
Let's Vibe!
Configure options and generate your content
⏱️ Processing Time: Images (15-30 seconds) | Videos (5-7 minutes)
🚀 Getting Started
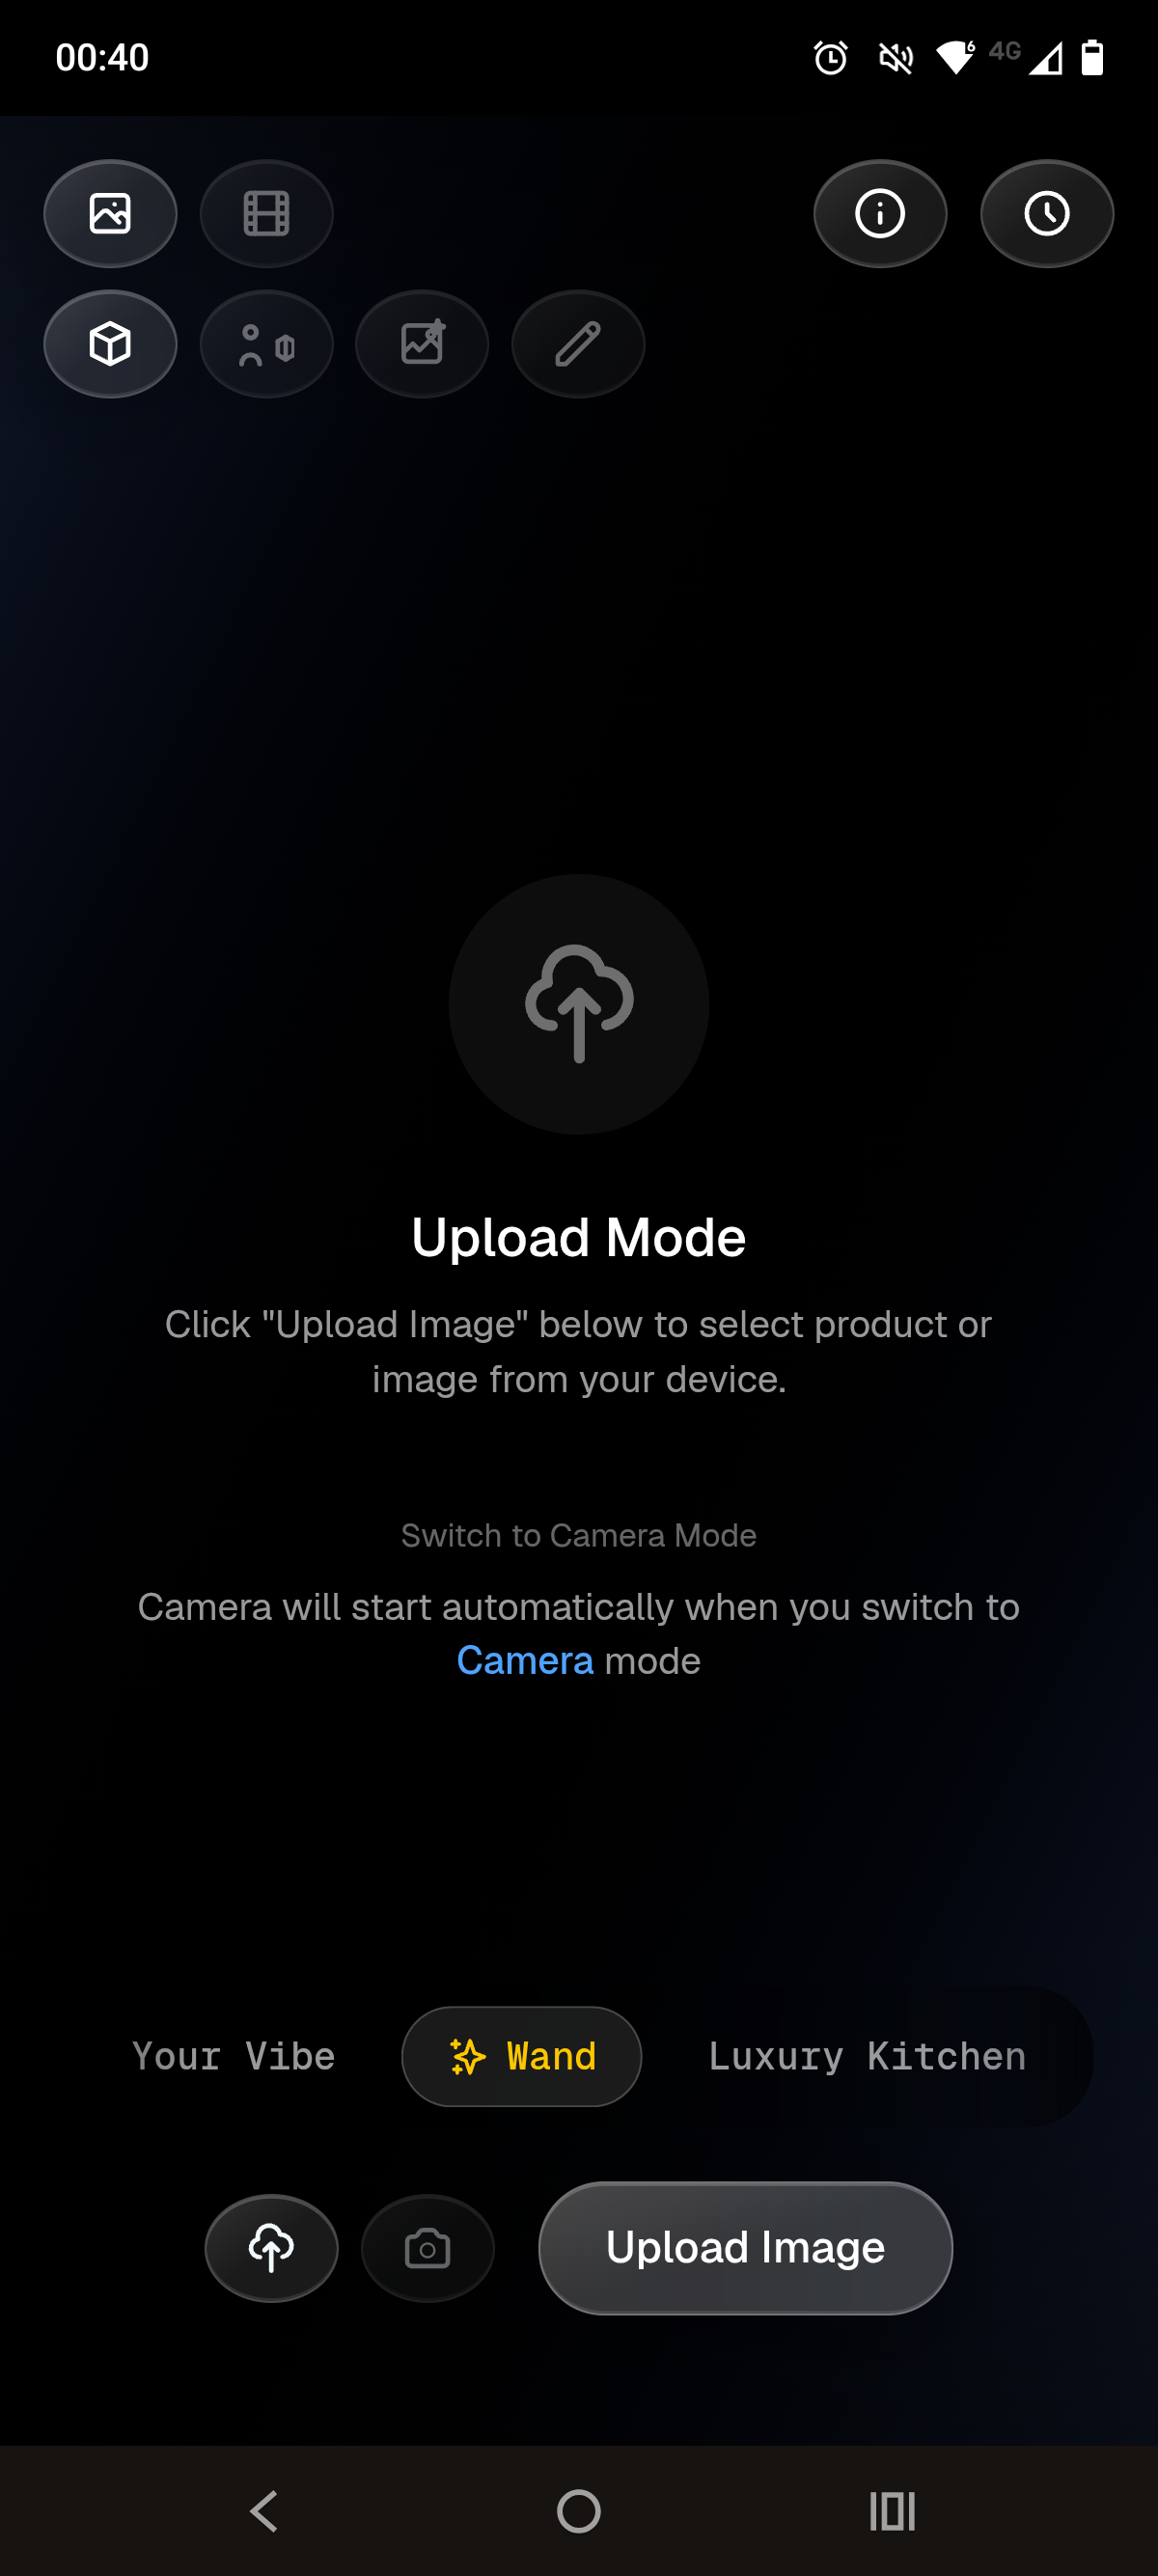
After signing in with your magic link, you'll see Upload Mode by default on Image + Product. You can toggle between Upload and Camera modes to provide your product image.
📤 Upload Mode (Default)
Click "Upload Product" to select a product photo from your device
📸 Camera Mode
Switch to Camera mode to take a new photo using your device camera
Screen 1: Upload Mode (Default View)
Upload a product photo from your device - this is what you see after signing in
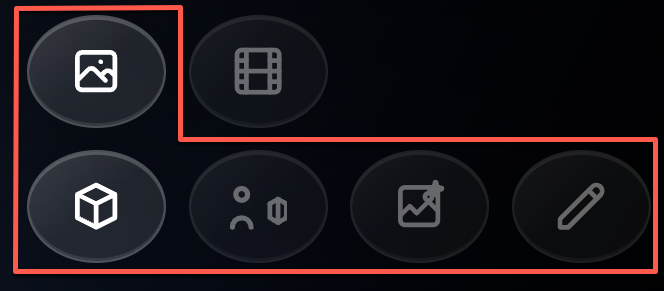
Top Bar - Content Type Selection
📸 Visual Reference:
Image Mode
Video Mode
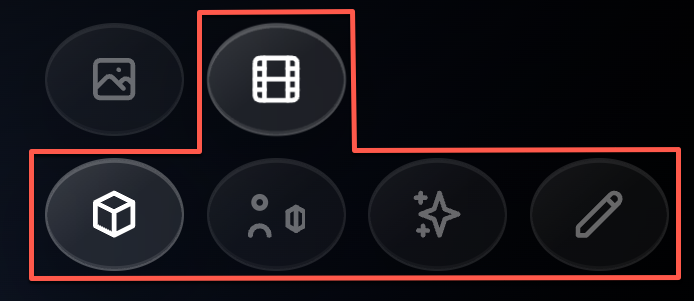
Image Icon (Frame)
- • Shows 4 content type options when selected
- • Product Only, User + Product Image, Image Transformation, Freestyle
Video Icon (Film)
- • Shows 4 content type options when selected
- • Product Only, User + Product Video, VFX, Freestyle
📸 For Images - 4 Content Types:
Product Only Icon (3D Box)
- • Clean product photography with lifestyle backgrounds
- • Filters: luxury kitchen, neon nightlife, beach tropical, etc.
- • Perfect for e-commerce listings and product catalogs
User + Product Image Icon (Person with Product)
- • Authentic user-generated content style imagery
- • Filters: morning routine, workout, coffee shop, etc.
- • Great for social media and relatable marketing
Image Transformation Icon (Mountain with Star)
- • Advanced AI image editing and transformations
- • Enhance, stylize, or modify your product photos
- • Perfect for creative photo editing
Freestyle Mode Icon (Pen) - Images
- • Write your own description for unique transformations
- • Unlimited creative possibilities with "Your Vibe"
- • Ideal for custom brand aesthetics
🎥 For Videos - 4 Content Types:
Product Only Icon (3D Box)
- • Professional product video animations
- • Filters: minimalist motion, luxe elegant, 360 spin, etc.
- • Perfect for product showcases and advertisements
User + Product Video Icon (Person with Product)
- • Authentic UGC-style video content
- • Filters: unboxing reveal, tutorial demo, lifestyle vlog, etc.
- • Great for testimonials and social proof
VFX Icon (Sparkle/Stars)
- • Cinematic effects and advanced video transformations
- • Dynamic animations and motion graphics
- • Perfect for eye-catching social media content
Freestyle Mode Icon (Pen) - Videos
- • Write your own description for unique video animations
- • Unlimited creative possibilities with "Your Vibe"
- • Ideal for custom brand video content
Top Bar - Quota & History
📊 Visual Reference:
Quota & History Icons
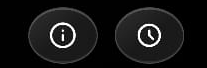
Info Icon (i)
History Icon (Clock)
Filter Selection
🎨 Visual Reference:
Filter Carousel

Your Vibe
Wand (AI Auto)
Other Filters
- • Each filter has a unique name and style
- • Product filters: Luxury Kitchen, Modern Office, Beach, etc.
- • User + Product filters: Morning Routine, Workout, Unboxing, etc.
- • Image Transform filters: Enhance, Stylize, Edit, etc.
- • VFX filters (videos only): Special effects and transformations
Aspect Ratio / Orientation
📐 Visual Reference:
Aspect Ratio Selector

Aspect Ratio Display
Arrow Buttons
Upload Your Product
📤 Visual Reference:
Upload Controls

Upload Product Button
Switch to Camera Mode
- • The camera will start automatically when you switch
Screen 1b: Camera Mode
Take a photo using your device camera - accessible by clicking 'Switch to Camera Mode'
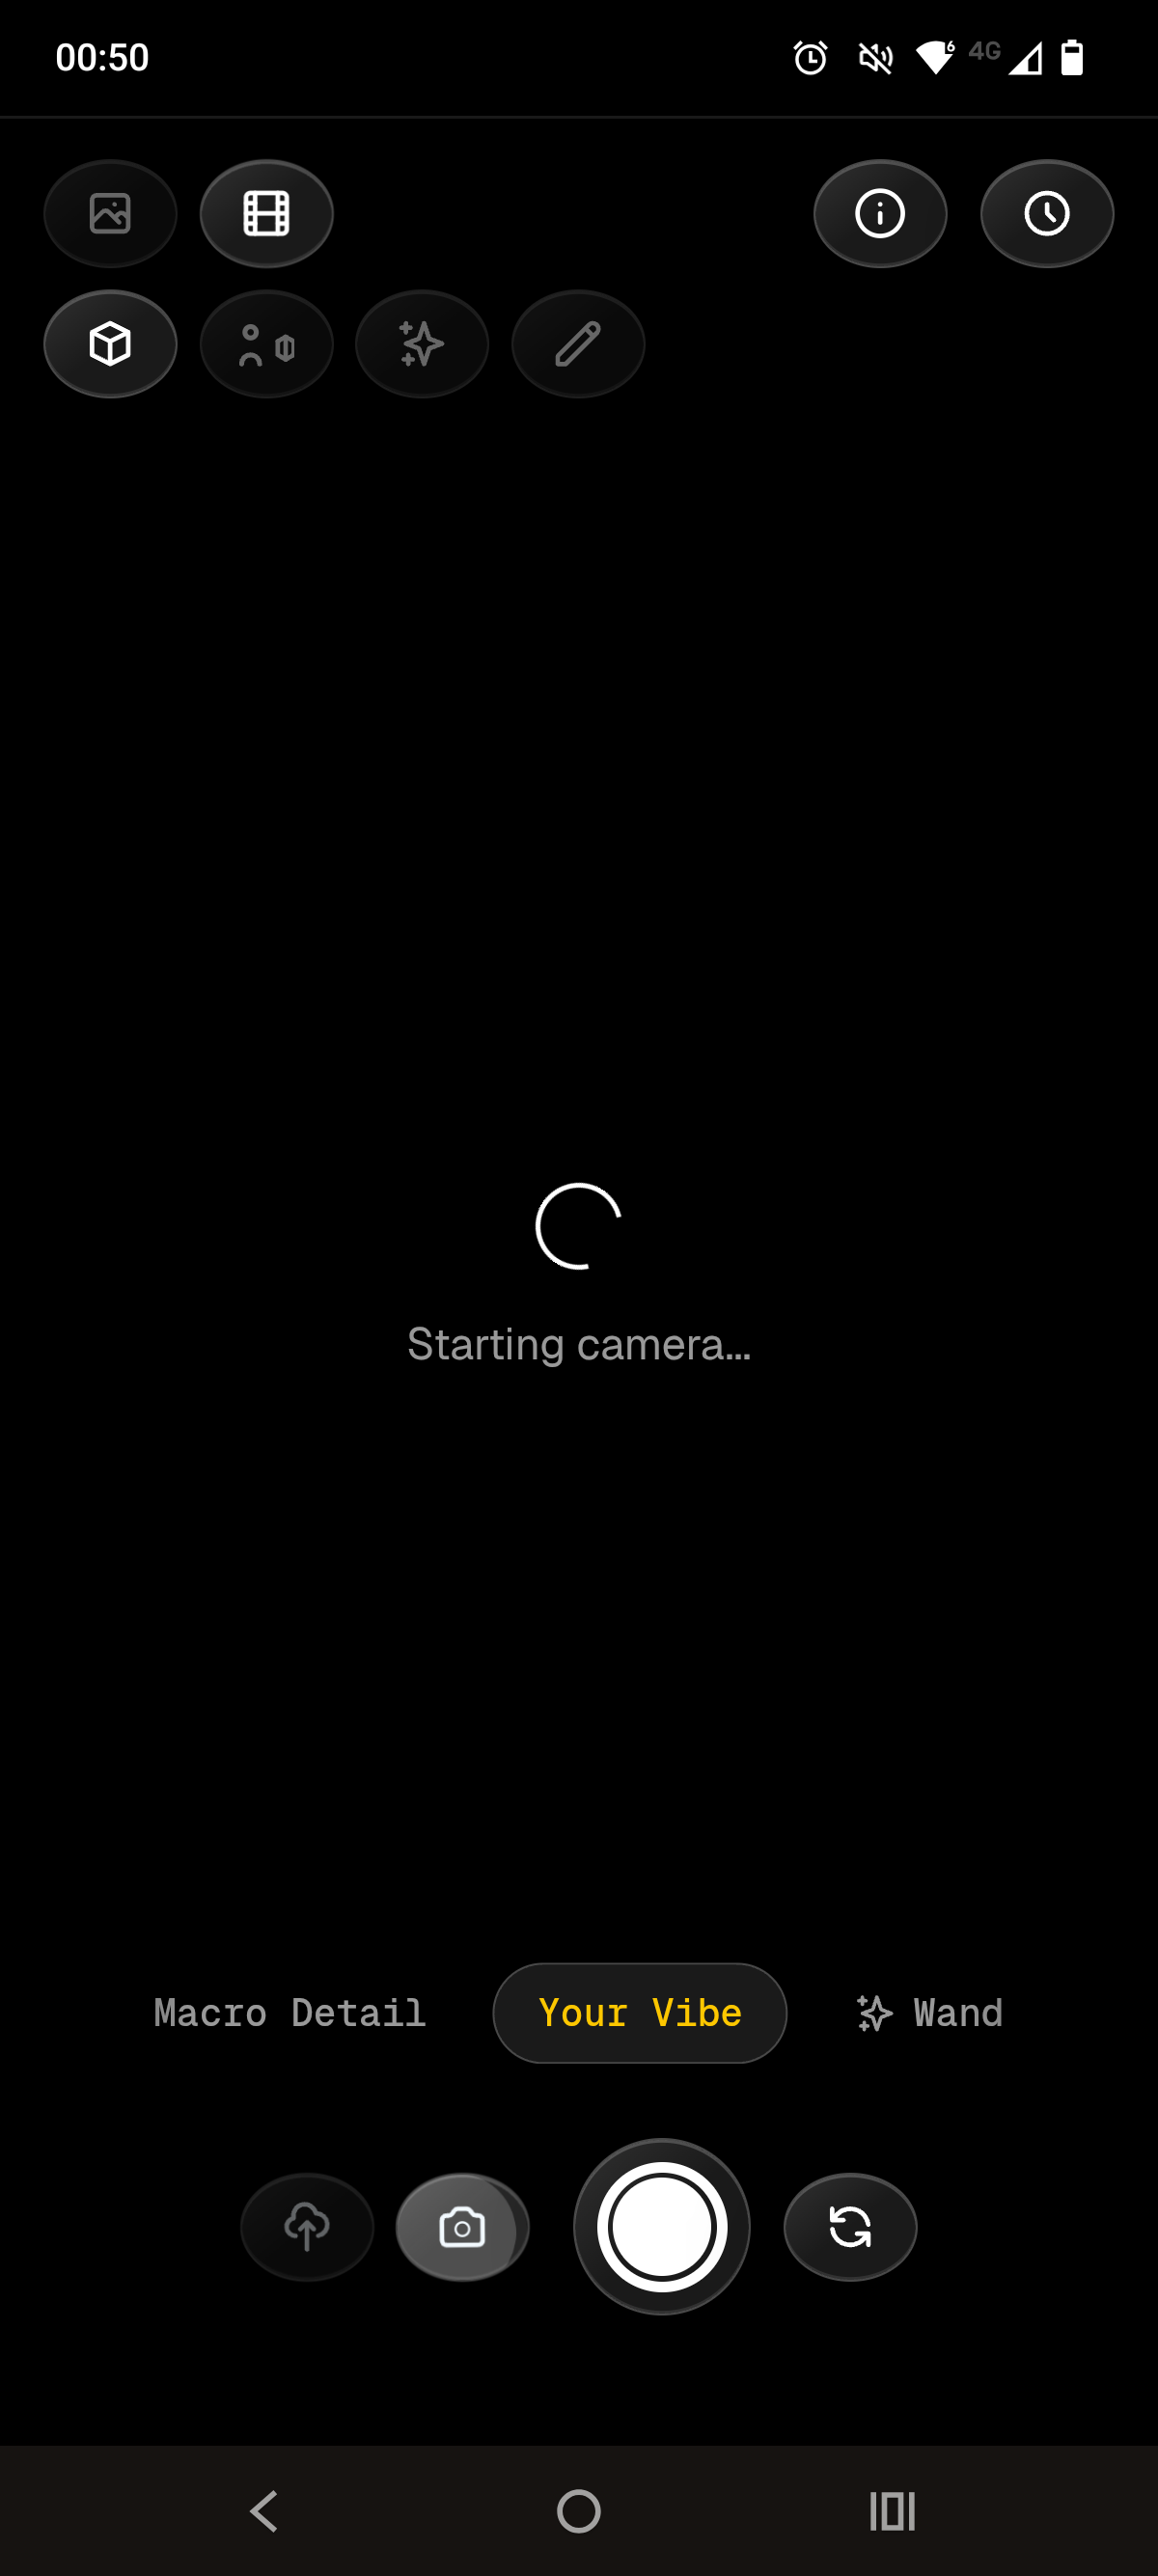
Camera Feed
Live Camera View
Filter Selection (Same as Upload Mode)
🎨 Visual Reference:
Filter Carousel

Filter Carousel
- • Swipe horizontally or use arrow keys
- • Currently showing "Simple Background" filter
Aspect Ratio (Same as Upload Mode)
📐 Visual Reference:
Aspect Ratio Selector

Aspect Ratio Selector
Camera Controls
📷 Visual Reference:
Camera Control Buttons

Upload Icon (Cloud Arrow)
Camera Icon (Gray)
Capture Button (Large White Circle)
Flip Camera Icon (Circular Arrows)
Switching Between Modes
Upload ↔ Camera Toggle
- • Upload Mode: Click cloud arrow icon or "Upload Product" button
- • Camera Mode: Click camera icon or "Switch to Camera Mode" link
- • Your filter and aspect ratio selections are preserved
Screen 2: Image Options - Basic
Configure text overlay and branding options for your image
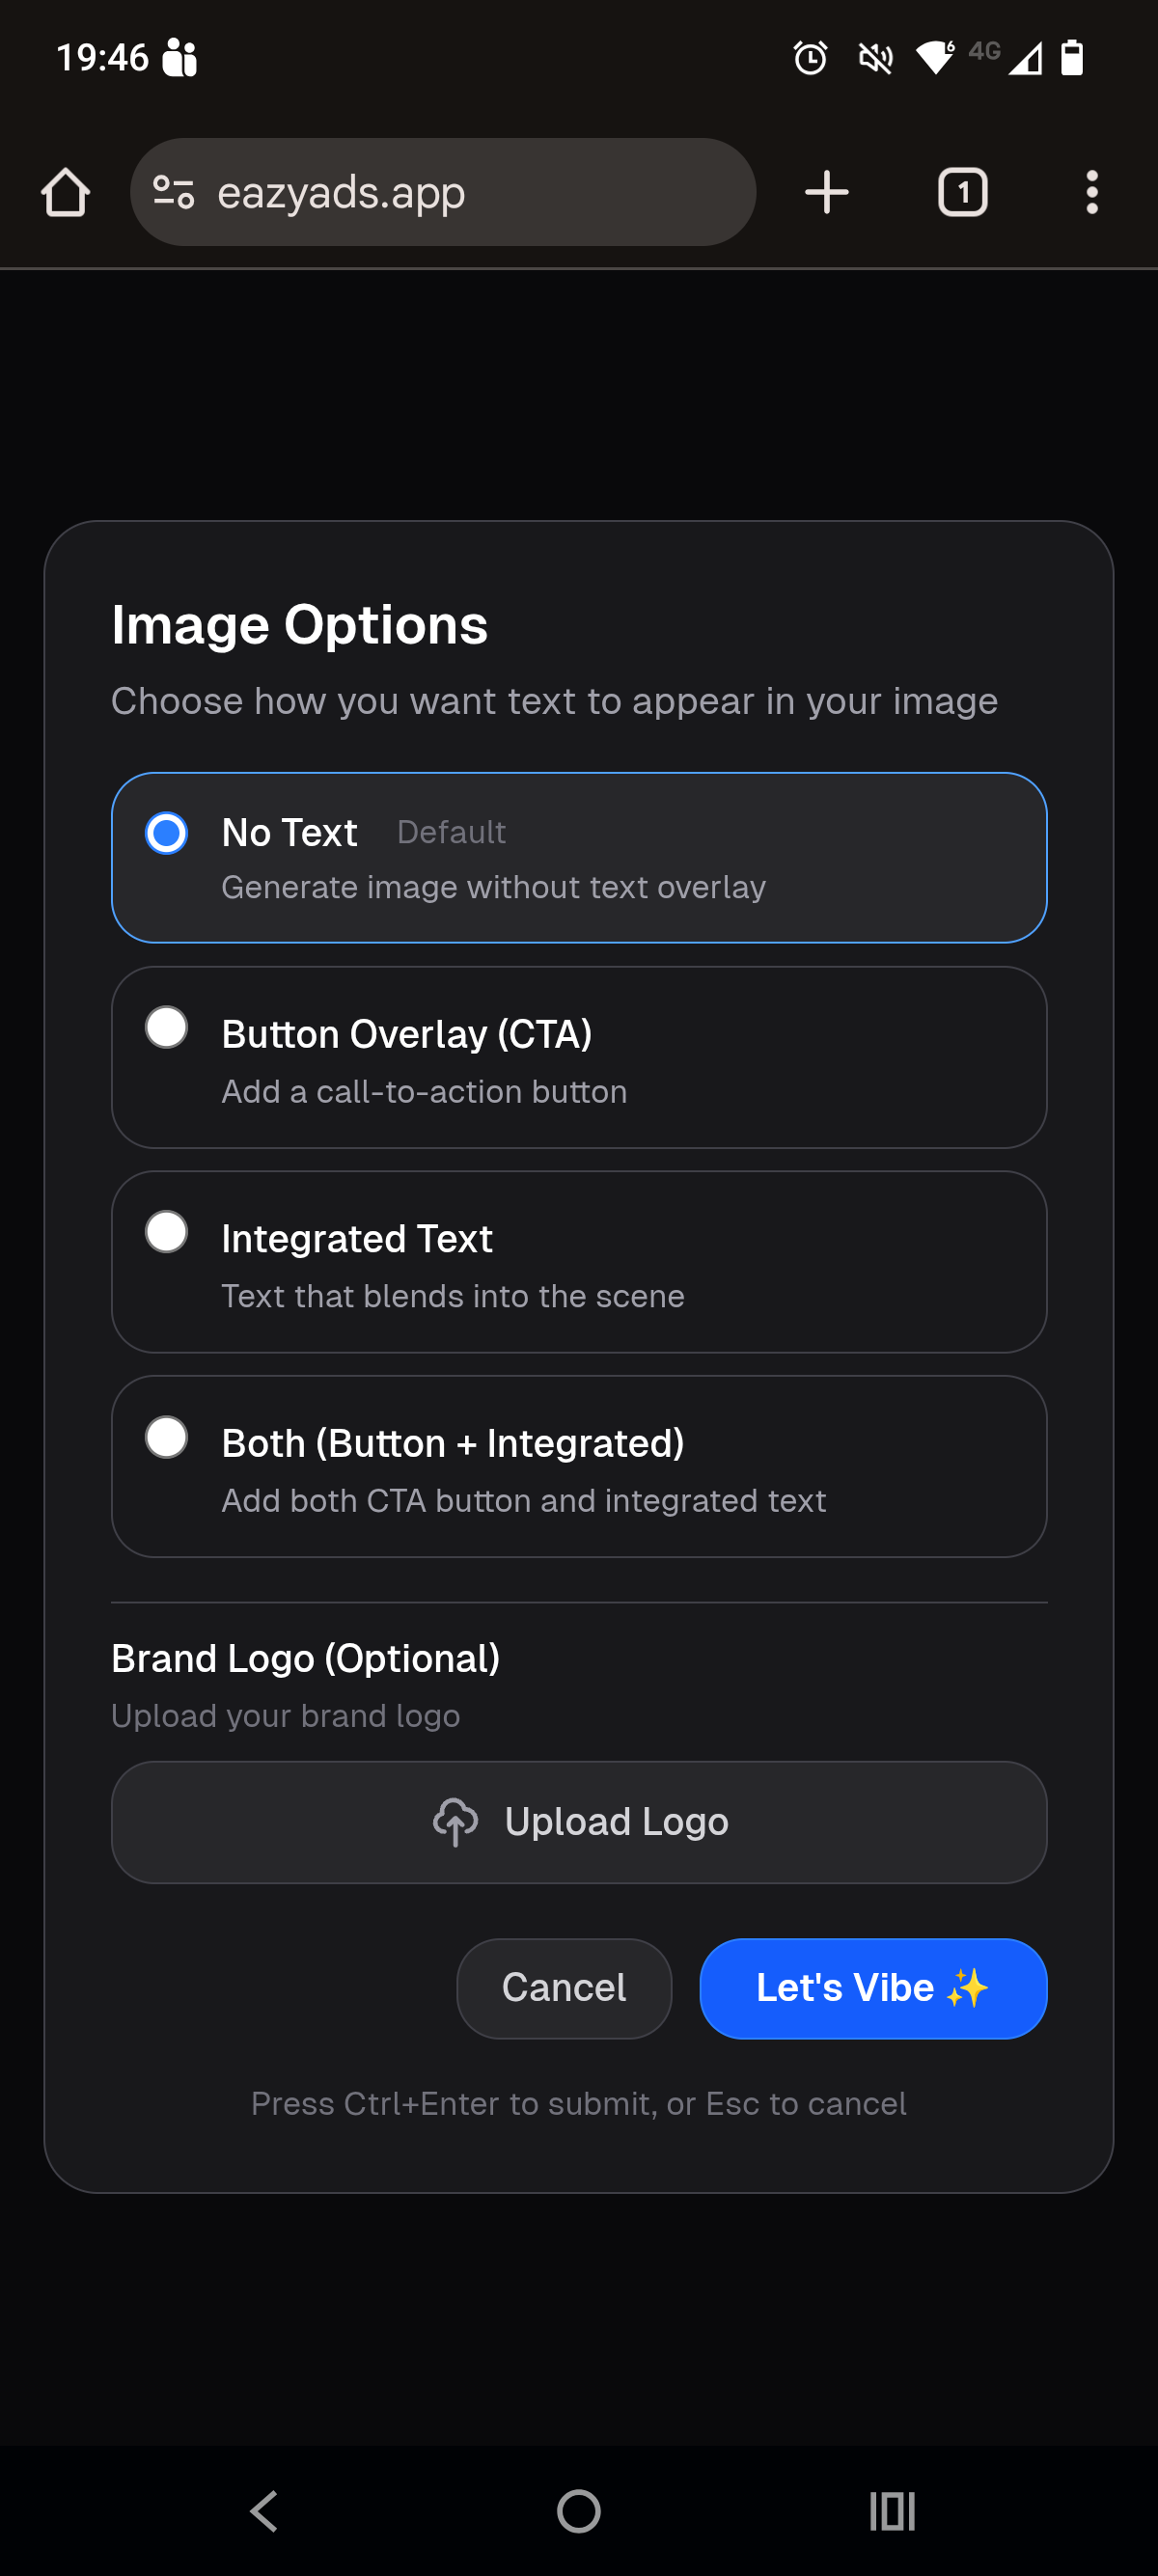
Text Overlay Options
No Text (Default)
- • Clean product image with no added text
Button Overlay (CTA)
- • Examples: "Shop Now", "Buy Now", "Learn More"
Integrated Text
- • Text appears as part of the environment
Both (Button + Integrated)
Brand Logo
Upload Logo Button
- • Optional: Skip if you don't want branding
Action Buttons
Cancel Button
Let's Vibe Button
Screen 3: Image Options - Background Types
Choose background style and appearance for your product image
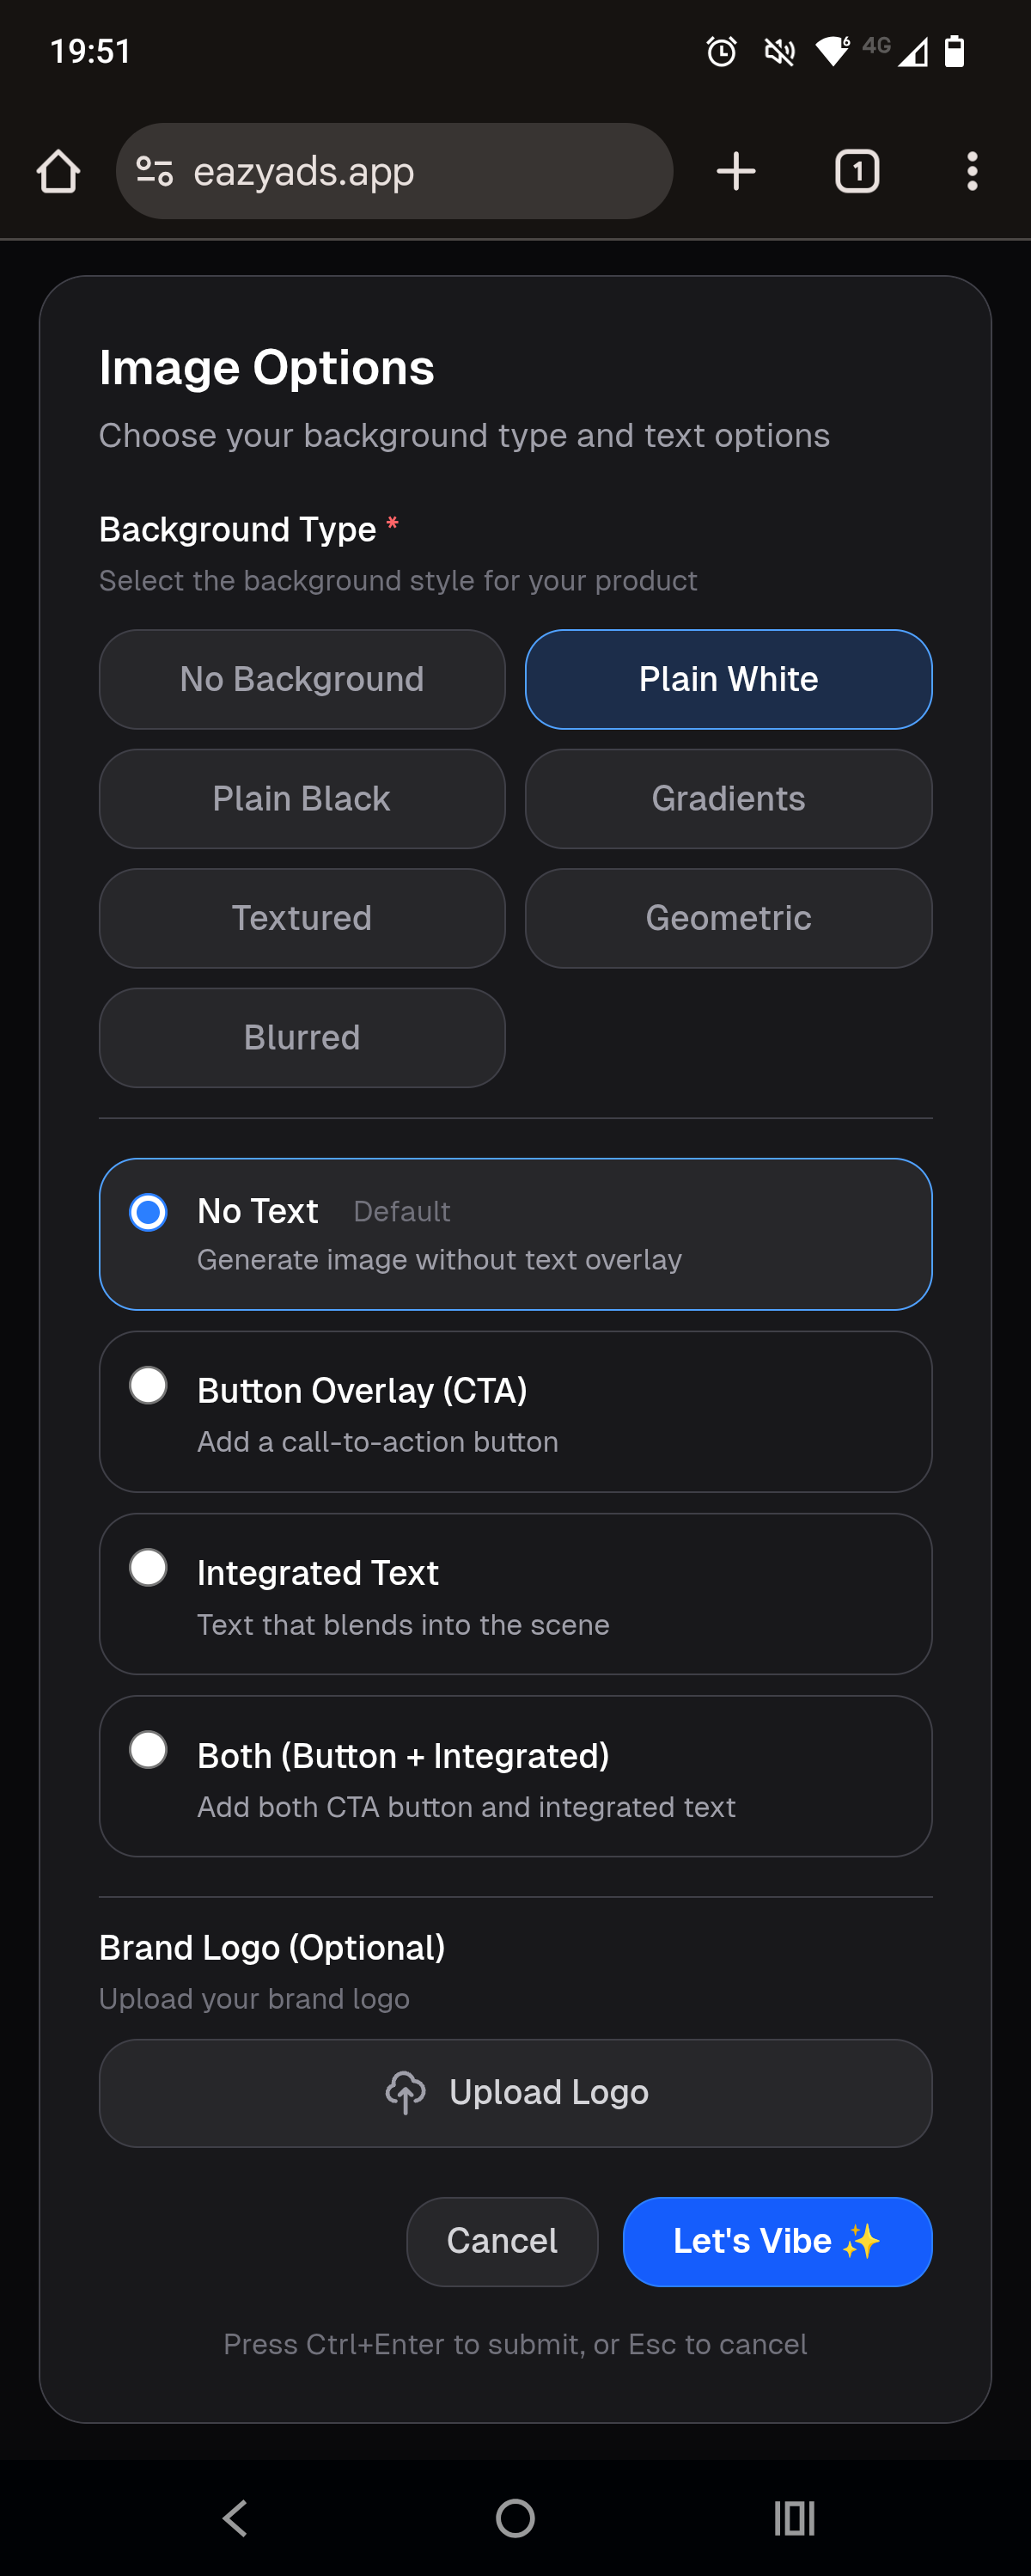
Background Type Selection
No Background
Plain White
Plain Black
Gradients
Textured
Geometric
Blurred
Text Options
No Text (Default)
Button Overlay (CTA)
Integrated Text
Both (Button + Integrated)
Brand Logo
Upload Logo Button
Action Buttons
Cancel
Let's Vibe
Screen 4: Image Options - UGC with Skin Tone
Configure UGC images with person appearance settings
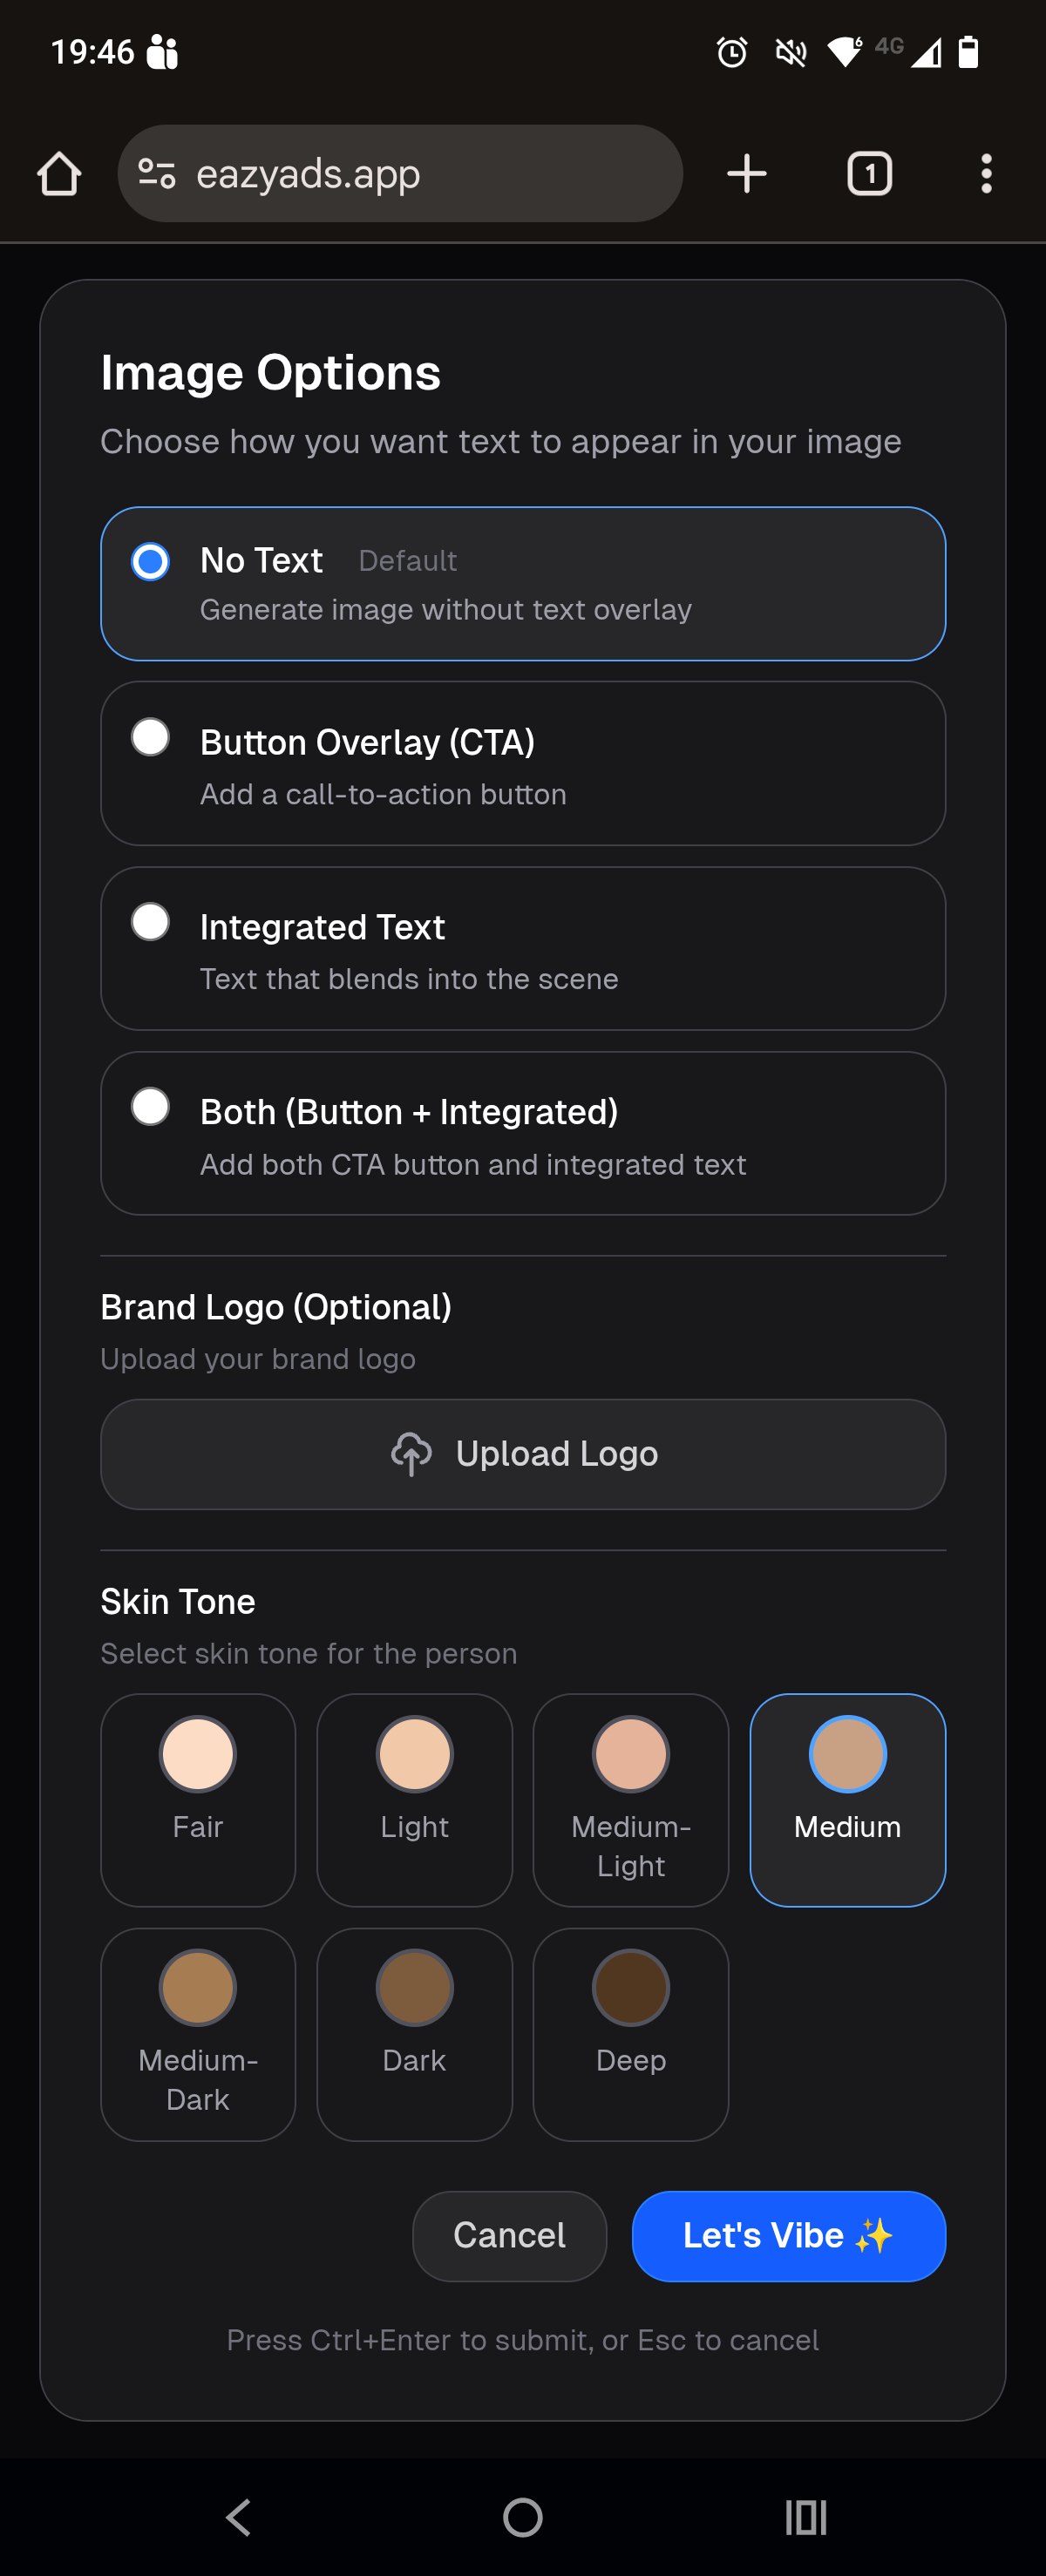
Text Options
No Text (Default)
Button Overlay (CTA)
Integrated Text
Both (Button + Integrated)
Brand Logo
Upload Logo Button
Skin Tone Selector (For UGC Content)
Fair
Light
Medium-Light
Medium
Medium-Dark
Dark
Deep
Action Buttons
Cancel
Let's Vibe
Screen 5: Video Options
Configure audio, text, and branding for your videos (same modal for both Product and UGC videos)
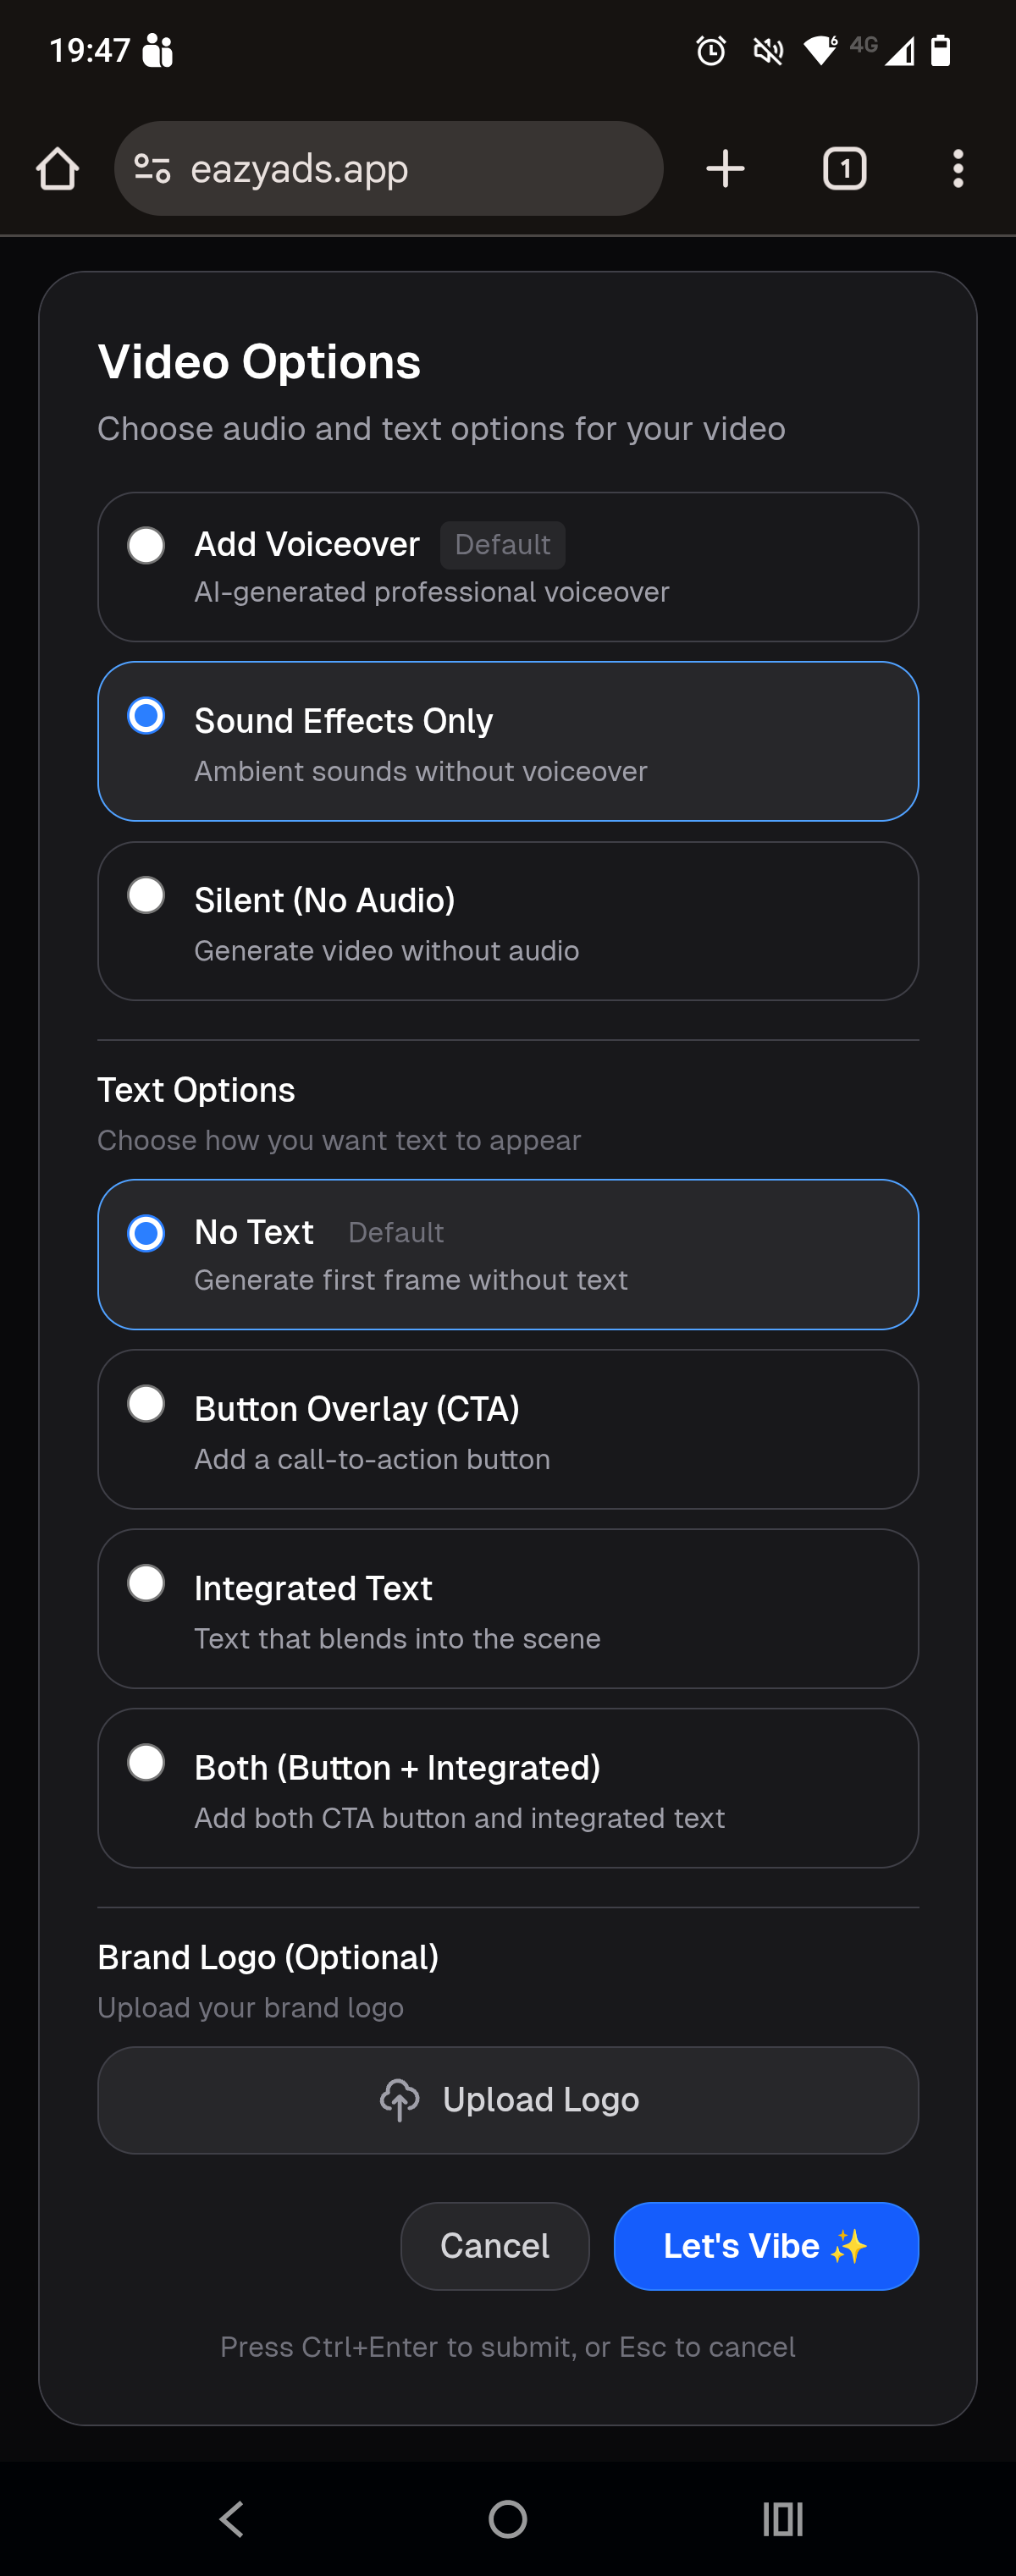
Note:This same modal appears for both Product videos and UGC videos. UGC videos include an additional "Skin Tone" selector at the bottom.
Audio Options
Add Voiceover (Default)
- • You can provide product details for a custom voiceover
- • Or leave empty for automatic product description narration
Sound Effects Only
- • Background music and atmospheric effects only
Silent (No Audio)
Text Options
No Text (Default)
Button Overlay (CTA)
- • Examples: "Shop Now", "Learn More", "Buy Now"
Integrated Text
Both (Button + Integrated)
Brand Logo (Optional)
Upload Logo Button
- • Optional - you can skip this if you don't want branding
Action Buttons
Cancel
Let's Vibe ✨
Screen 6: Video Options - UGC with Skin Tone
UGC videos include the same options as product videos, plus a skin tone selector
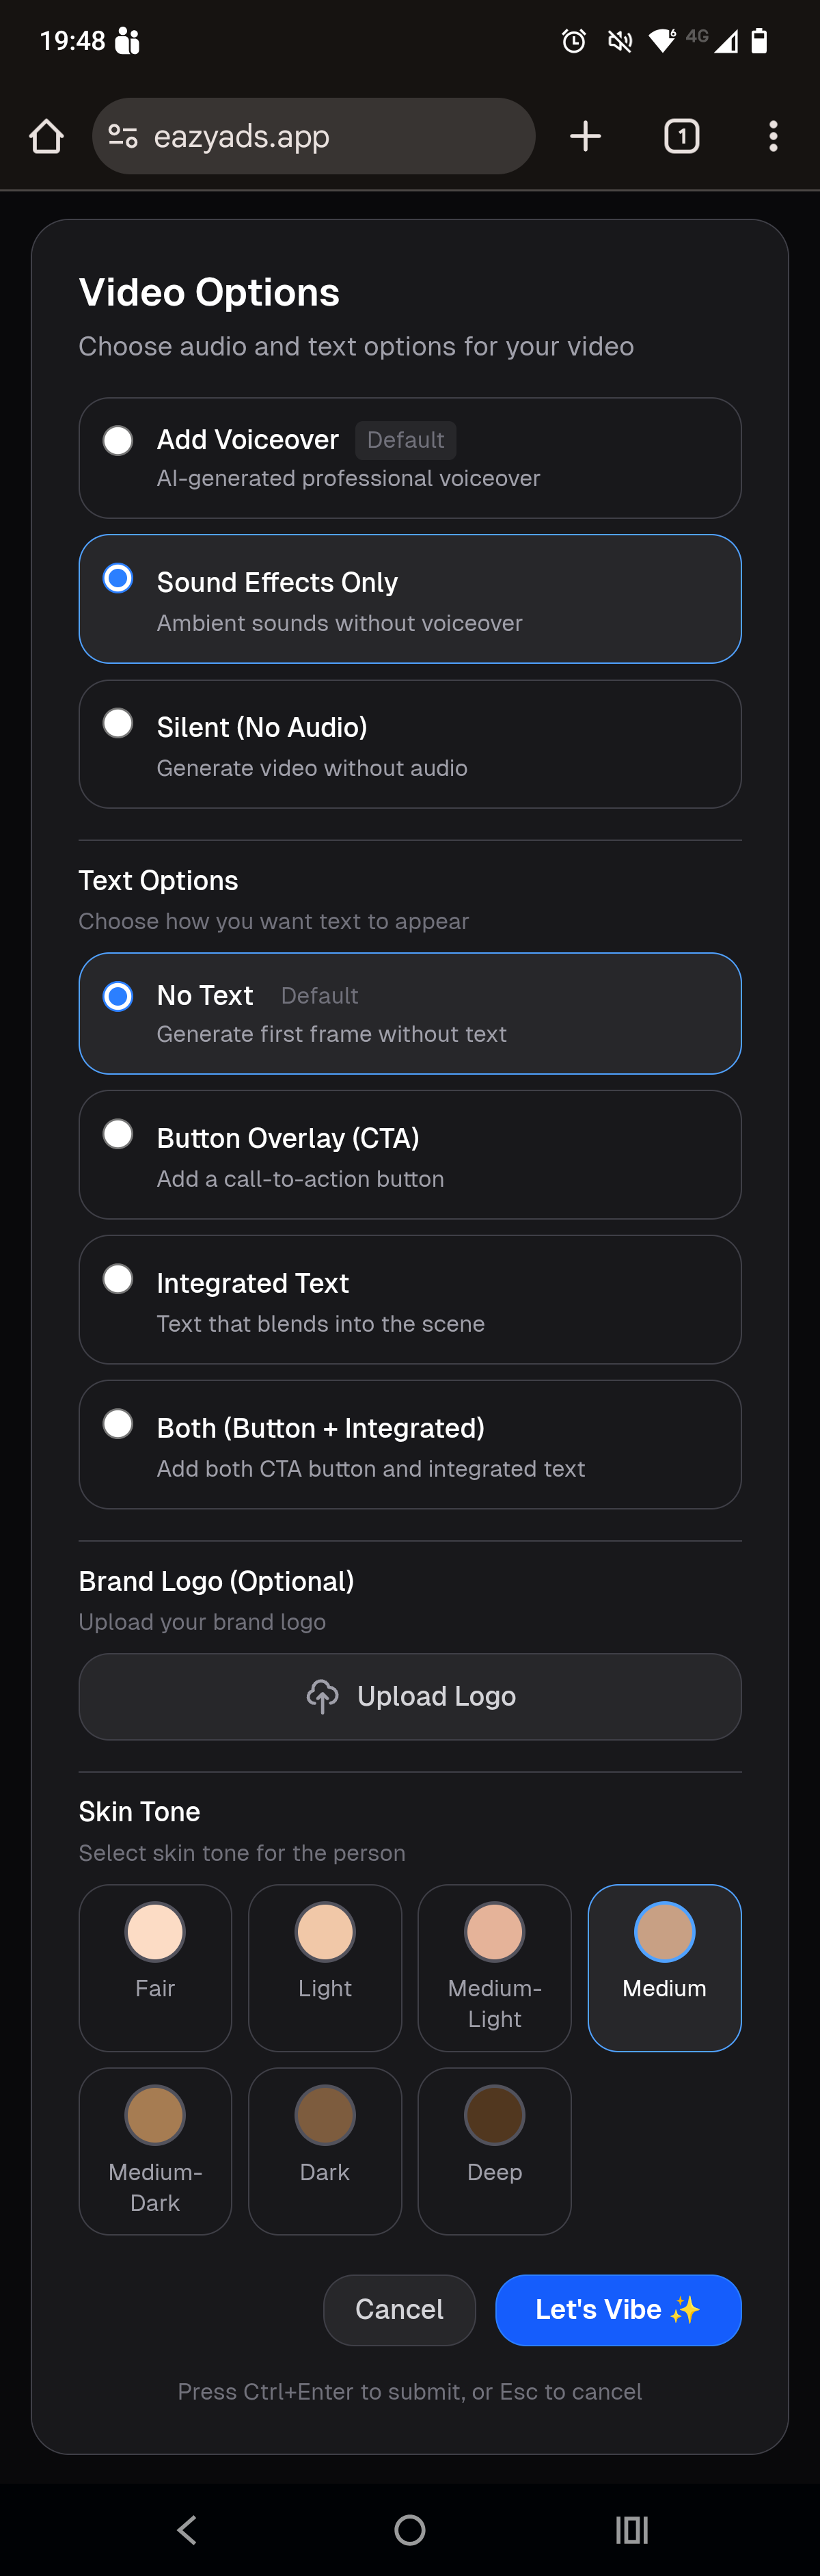
UGC Videos Only:When creating UGC videos (person using product), you'll see all the standard video options plus an additional "Skin Tone" section.
All Standard Video Options
Audio, Text, and Logo Options
- • Audio Options: Voiceover, Sound Effects, or Silent
- • Text Options: No Text, CTA Button, Integrated, or Both
- • Brand Logo: Optional upload
Skin Tone Selector (UGC Videos Only)
Fair
Light
Medium-Light
Medium (Selected in Example)
Medium-Dark
Dark
Deep
Action Buttons
Cancel
Let's Vibe ✨
Screen 7: Your Vibe - Custom Prompt
Create custom transformations with your own creative descriptions

Custom Transformation
Text Input Area
- • Type your creative vision in detail
- • Minimum 10 characters required
- • Example shown: "Transform my product into a futuristic sci-fi setting with neon lights and holographic elements"
Example Text
Brand Logo
Upload Logo Button
Action Buttons
Cancel
Let's Vibe
Screen 8: History Logs - Grid View
Browse all your previously generated images and videos
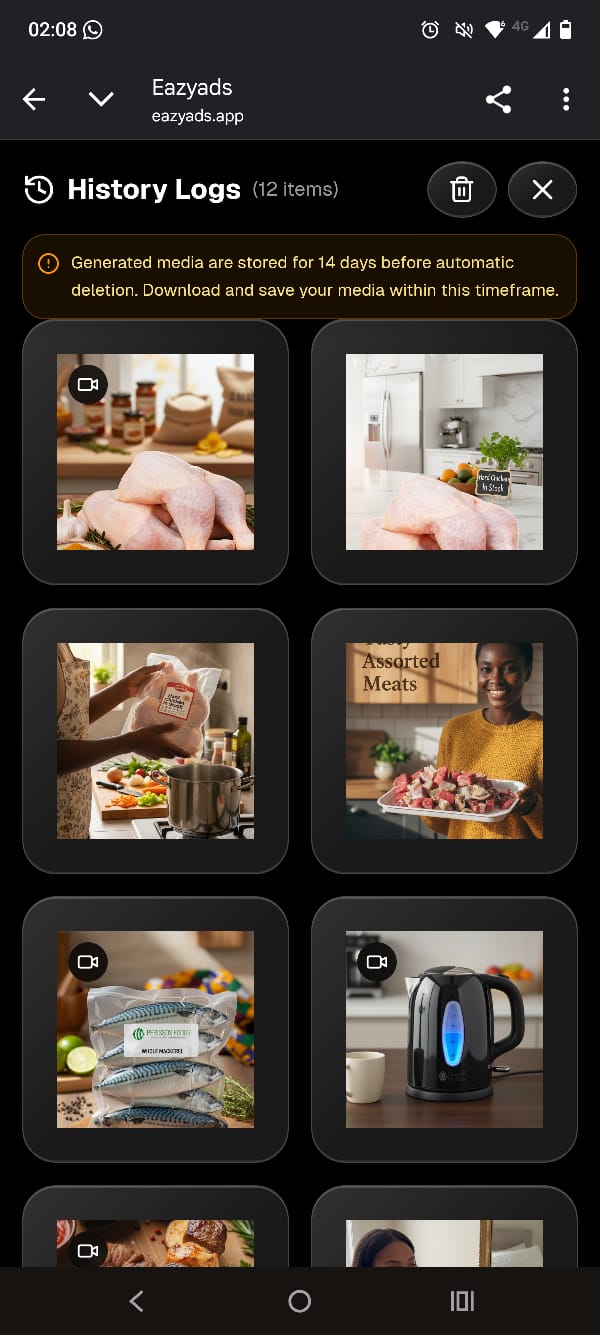
Header
History Logs Title
Delete All Button (Trash Icon)
Close Button (X)
Storage Warning Banner
14-Day Auto-Delete Notice
- • Generated media is stored for 14 days before automatic deletion
- • Download and save your media within this timeframe
- • Orange warning banner at the top
Media Grid Display
Thumbnail Grid
- • Each thumbnail shows a preview of your generated content
- • Videos are marked with a video icon
- • Click any thumbnail to view full-size
- • Grid adapts to screen size (2-4 columns)
Screen 9: History Preview - Full View
View, download, share, or delete individual media items
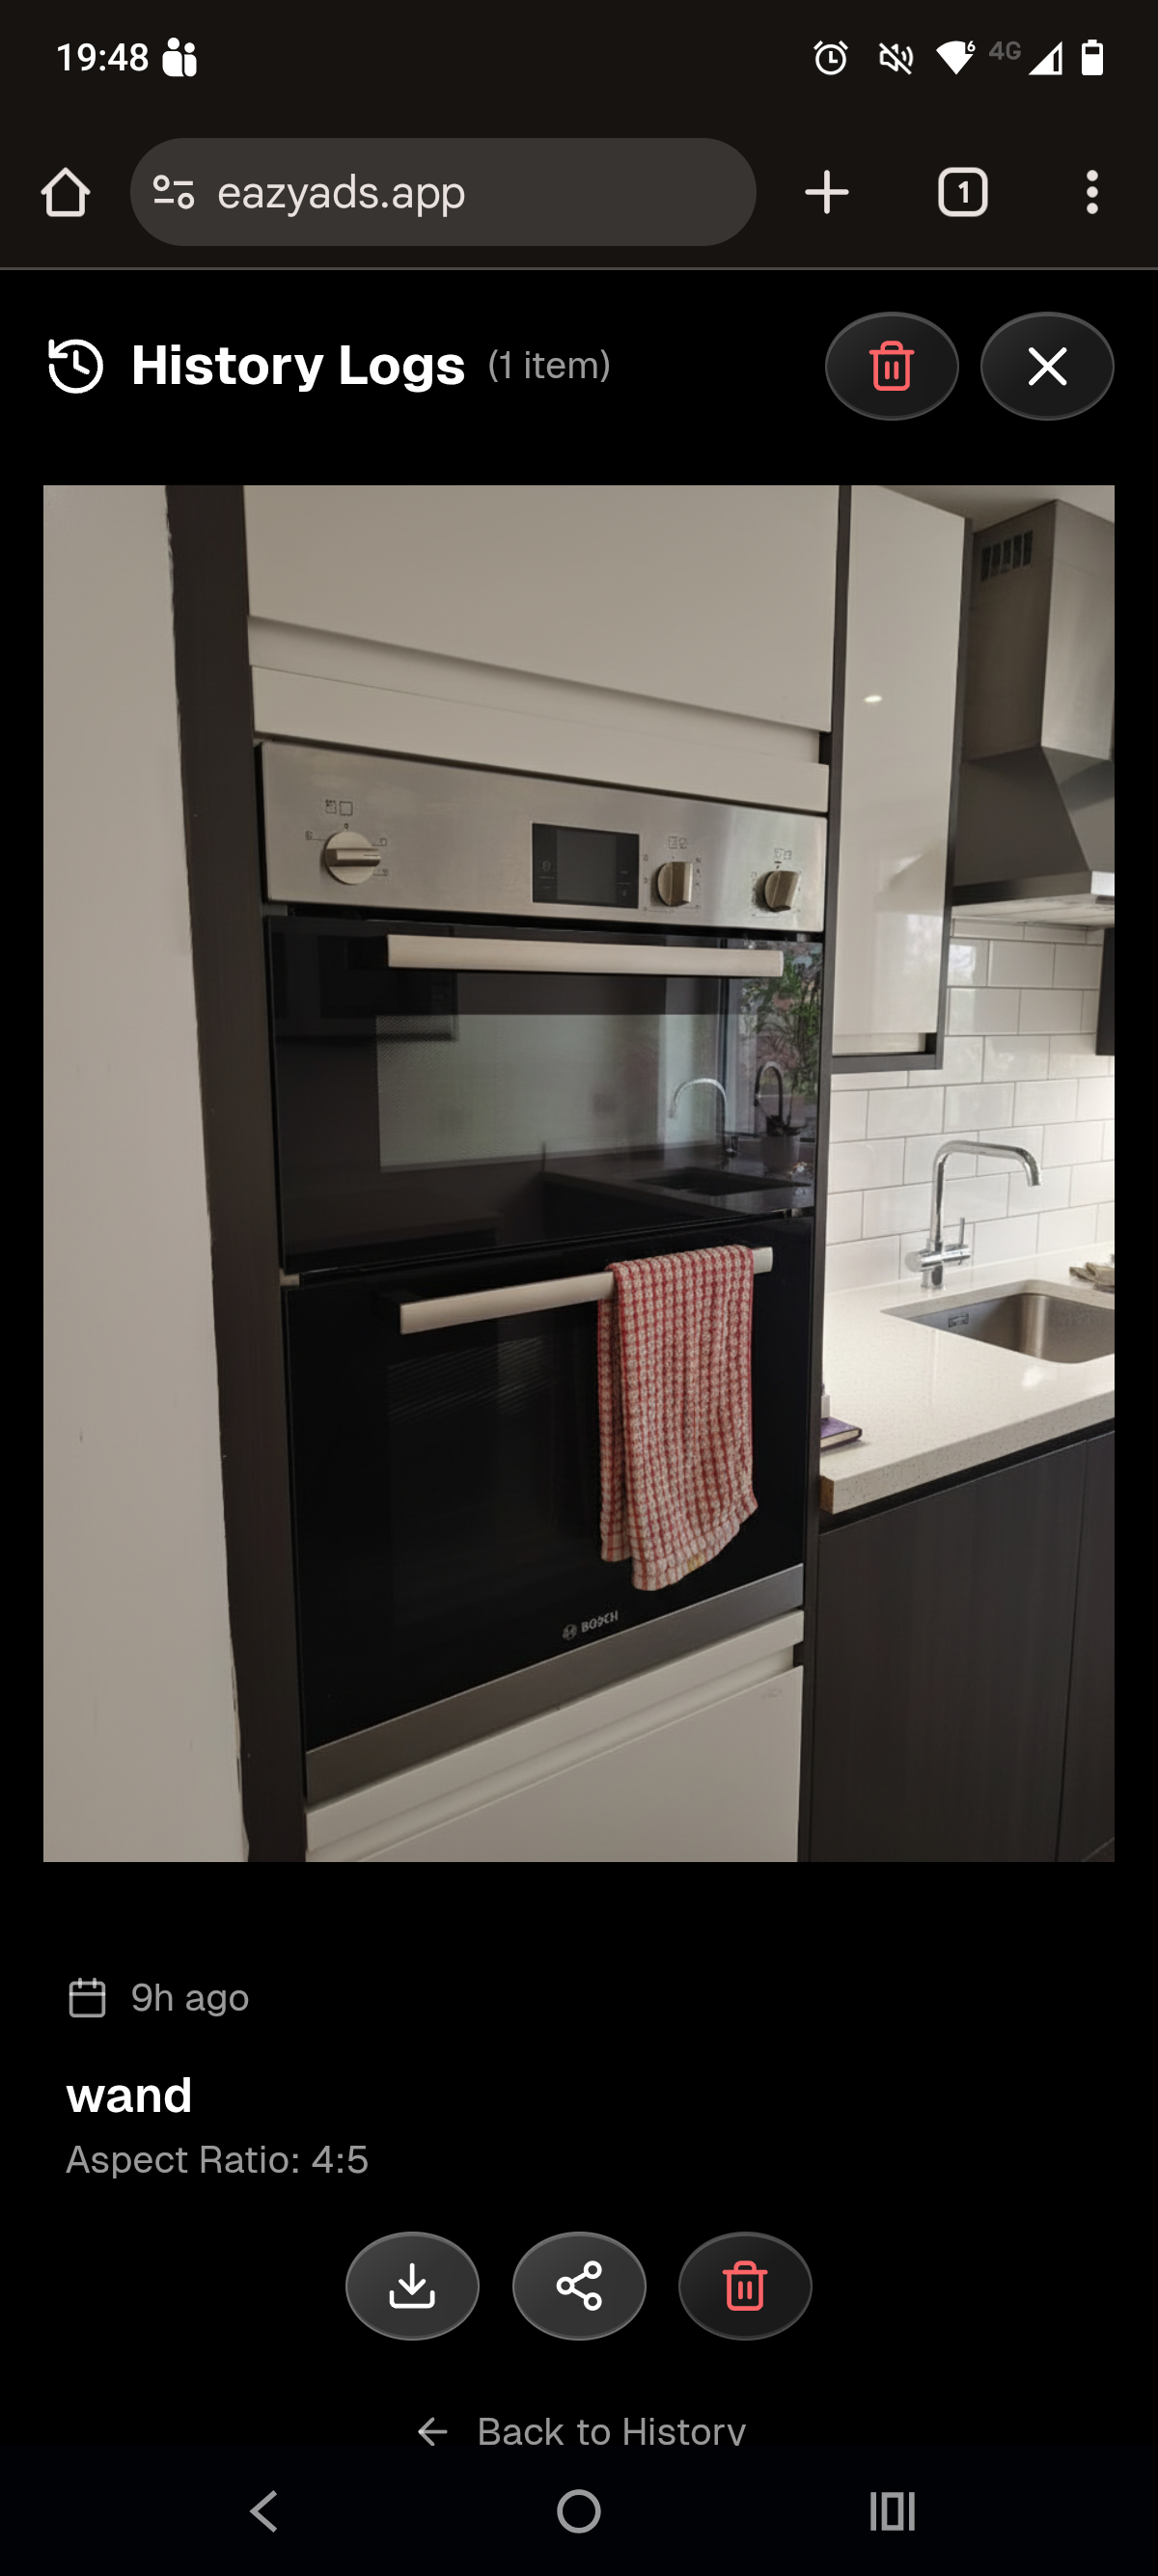
Header
History Logs Title
Delete Button (Trash Icon)
Close Button (X)
Media Display
Full-Size Preview
- • Videos auto play
- • Images shown at full resolution
Media Information
Timestamp
Filter Name
Aspect Ratio
Action Buttons
Download Button
Share Button
Delete Button
Navigation
Back to History Link
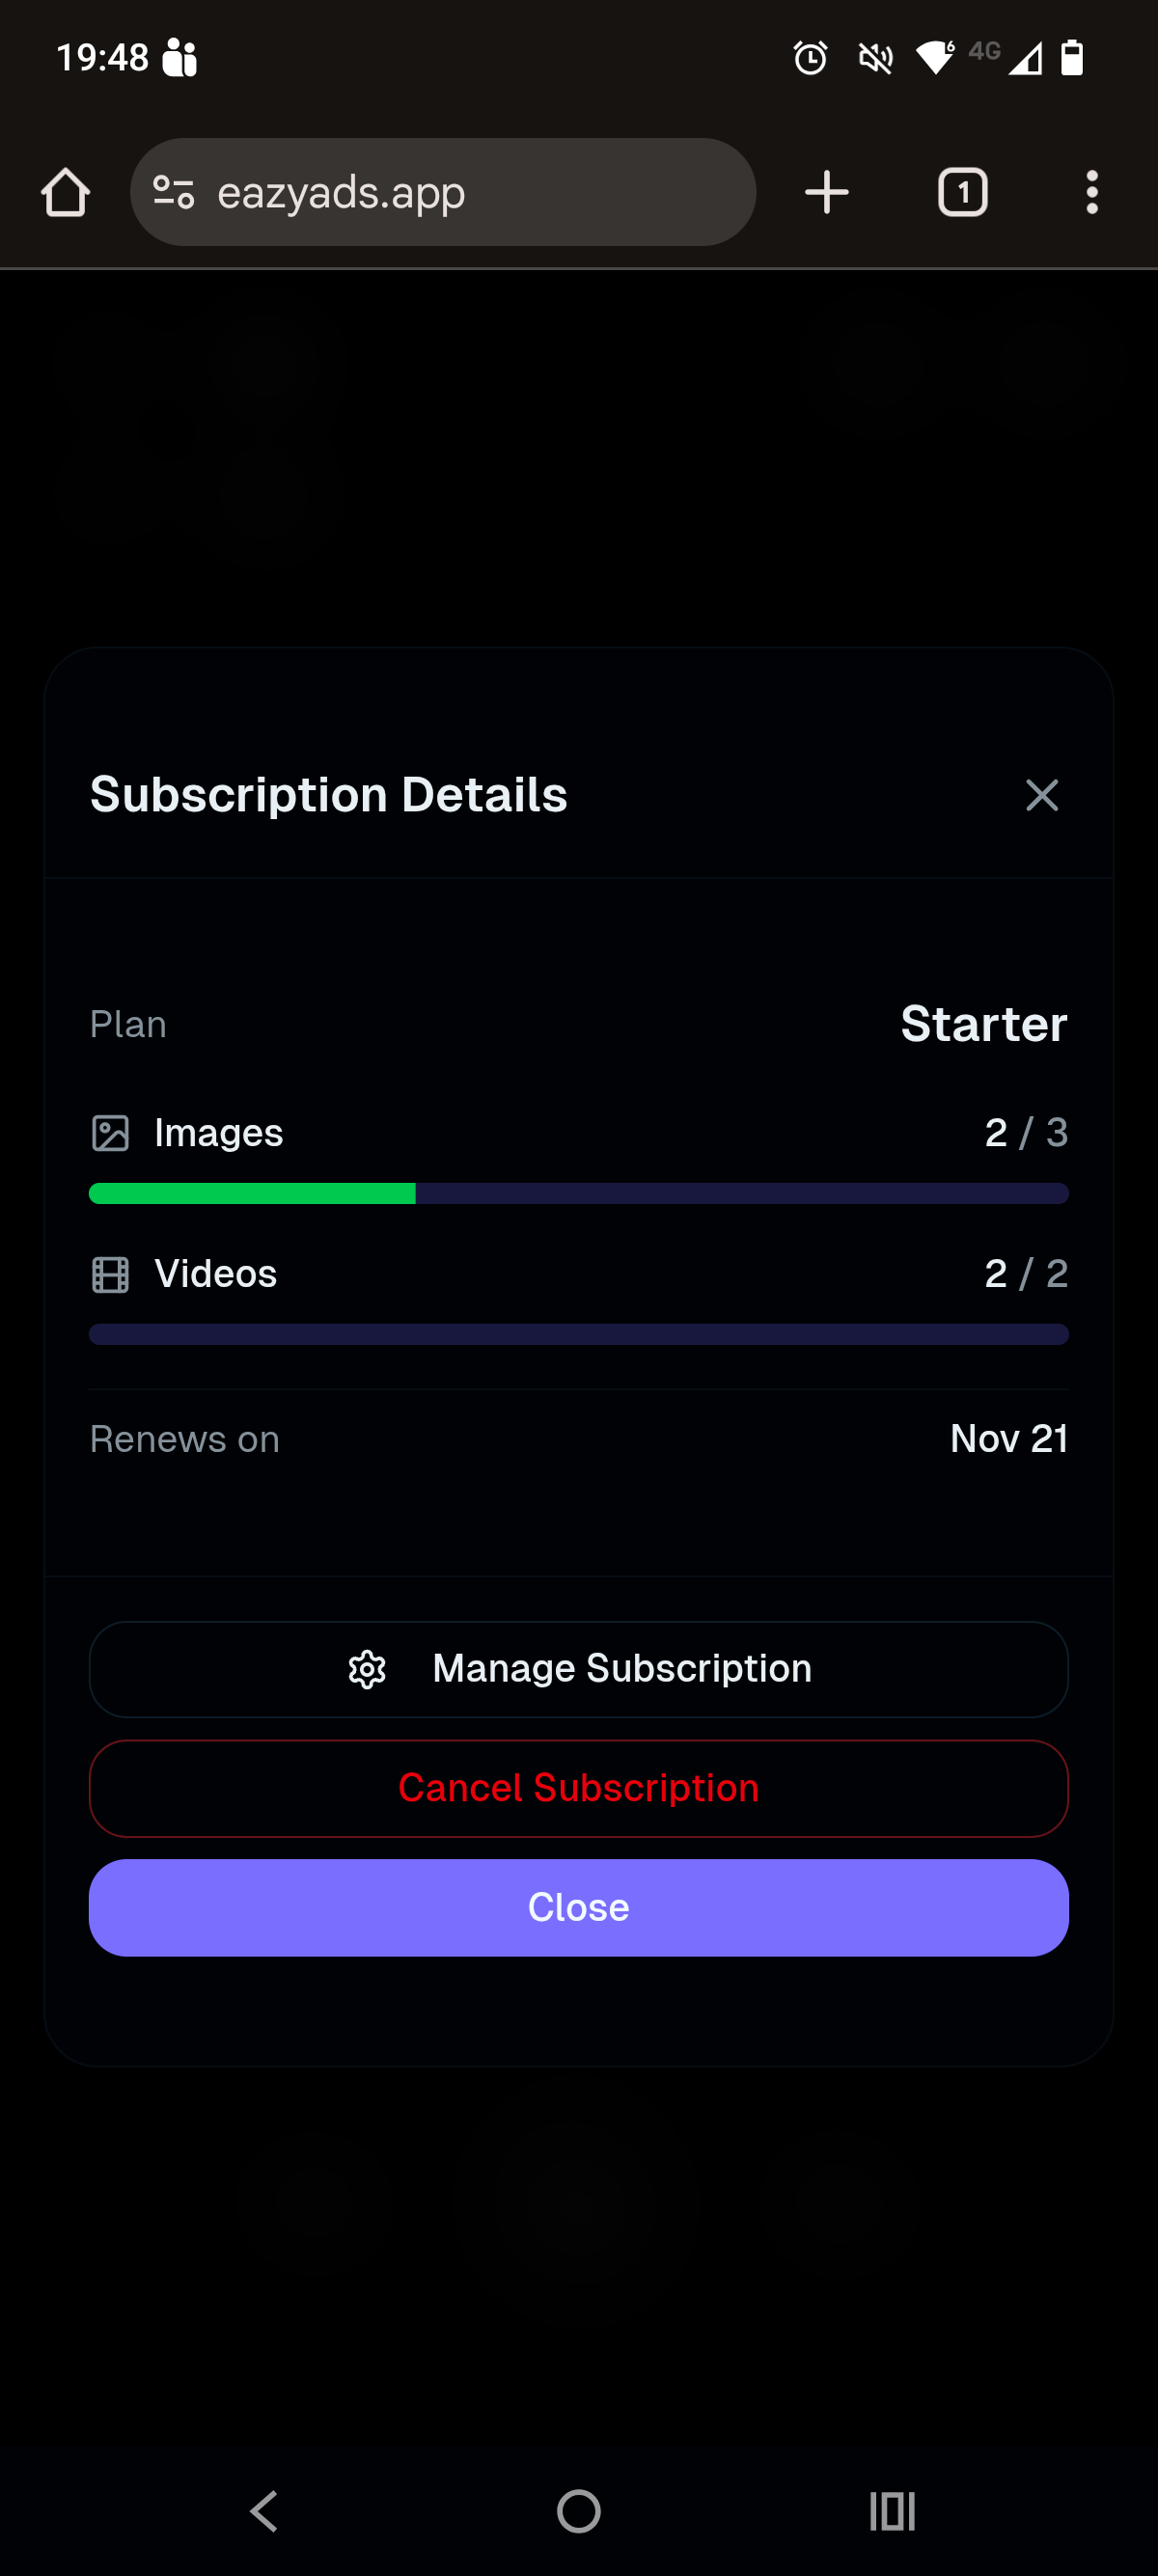
Screen 10: Subscription Details
View usage quotas and manage your subscription
Header
Subscription Details Title
Close Button (X)
Plan Information
Plan Name
Usage Quotas
Images Quota
- • Example: "2 / 3" with progress bar
- • Shows portion used and portion remaining
Videos Quota
- • Example: "2 / 2" with progress bar
- • Shows portion used and portion remaining
Renewal Information
Renews On
- • When your quota resets
Management Buttons
Manage Subscription Button
- • Change plan, update payment method
- • View invoices
Cancel Subscription Button
- • Warning: Red text indicates destructive action
- • You keep access until renewal date
Close Button
🎯 Quick Reference - Common Tasks
📸 How to create a product-only image?
- Select Image icon and Product Only icon (3D box) (top bar)
- Swipe to choose a filter (or use Wand for AI auto)
- Click "Upload Product" or switch to Camera mode
- Configure options in the modal (text, logo, background)
- Click "Let's Vibe" and wait 15-30 seconds
👤 How to create a user + product image?
- Select Image icon and User + Product icon (person) (top bar)
- Choose a UGC-style filter (e.g., Morning Routine, Workout)
- Upload your product photo
- Configure text, logo, and skin tone in the modal
- Click "Let's Vibe" and wait 15-30 seconds
🎨 How to transform/edit an image?
- Select Image icon and Image Transformation icon (mountain with star) (top bar)
- Choose an editing/transformation filter
- Upload the image you want to transform
- Configure enhancement options in the modal
- Click "Let's Vibe" and wait 15-30 seconds
🎥 How to create a user + product video?
- Select Video icon and User + Product icon (person) (top bar)
- Choose a UGC video filter (e.g., Unboxing, Tutorial)
- Upload your product photo
- Configure audio, text, skin tone in the modal
- Click "Let's Vibe" and wait 5-7 minutes
🎬 How to create a VFX video?
- Select Video icon and VFX icon (sparkle) (top bar)
- Choose a VFX filter with special effects
- Upload your product photo
- Configure audio, text options in the modal
- Click "Let's Vibe" and wait 5-7 minutes
✨ How to use Freestyle mode?
- Select Image or Video icon, then click Freestyle icon (pen)
- Upload your product photo
- Type your custom transformation description (min 10 characters)
- Configure additional options (text, logo, etc.)
- Click "Let's Vibe" to generate
📥 How to download my generated content?
- Click the History icon (clock) in top bar
- Click any thumbnail to view full-size
- Click the "Download" button
- File will be saved to your device (JPEG for images, MP4 for videos)
💡 Quick Tips
- 👆Navigation: Swipe horizontally to browse filters (mobile) or use arrow keys/mouse wheel (desktop)
- ⏱️Processing Times: Images take 15-30 seconds, Videos take 5-7 minutes
- 💾Storage: All media stored for 14 days - Download important files before expiration
- 📊Quotas: Check remaining quota in the Info icon (i) in top bar
- 📐Aspect Ratios: Choose from 9 different ratios for images, 2 orientations for videos
- ✨Custom Prompts: Be creative with "Your Vibe" - describe the setting, mood, and effects you want
- 🗂️History: Click thumbnails in history to view full-size, auto-syncs across devices
- 🔄Upload ↔ Camera: Freely switch between upload and camera modes anytime - your settings are preserved
⌨️ Keyboard Shortcuts
❓ Need Help?
- ℹ️Tap the Info icon (i) in top bar for app information and usage stats
- 🌐Visit eazyads.app/support for support
- 💳Check Subscription Details for usage and billing info